Email Administration
Basic Email Configuration
Allows the user to create Email Campaigns.

Campaign Data
Name
Campaign's name for identification purposes.Service Level
Is the calls percentage that were attended by the agent before a stipulated time.Strategy
Is the behavior that the campaign will have. To know more about this, please visit StrategiesSchedule
Time in which the campaign will be available, that is, with agents available to handle the interactions.
To add a schedule configuration you must add it with the '+' button and a new window will appear to add the schedule.
To delete a schedule, select it from the list and press the '-' button
Email Data
Account
Email account that is going to receive the emails.Password
Account password. If this one is wrong written the user will be notified and the campaign can not be created till the password of the account is right.Outbound SMTP
Protocol for simple assigned email transference.Inbound IMAP
Protocol for accessing internet messages.Port
Designated port number
To finish the creation process, the user must click on the "Save" button.
These parameters already have a default value for the proper functioning of the campaign.
To see more about its function visit Important concepts - Omnichannel
Maximum Interactions per Agent
Limits the amount of active interactions the agent can get. The rest of the interactions wait in queue.
Enable
The system can have a non working Email campaign, without the need of deleting it entirely and lose information. If checked, the campaign can be used.
Receive Emails
If enabled, emails from this email address will enter the system as an interaction.
Signature
In the Templates section, a new one can be configured and used as a signature that will be assigned here. When an agent responds/sends and email through the specific campaign, the signature will load automatically.
Enable qualification
When this checkbox is active, it enables two more fields that will be used to configure the rating of each outgoing email generated in the campaign.

Motivation to qualify
this is the title of the qualification an example could be 'Qualify our service' and it will be just above the rating icons.
Thanks for rating
By clicking on this field, we will be shown a modal to write a thank you message that will be shown to the client after qualifying.
Once we have everything configured and saved, when an email is sent through this campaign, the recipient can rate it.
Thresholds
These metrics to campaign statistics in real time, they are measured in time (seconds). For more information visit Thresholds - Omnichannel
Confirmation Message
When this box is activated with the check box next to it, the campaign can have a Template adjudicated. This one will work the following way, when a client sends a mail through that campaign, the client will get an automatic mail containing the template adjudicated, and an agent will get the interaction.
Encryption/Security
The user has three different options TLS, SSL y SMTP.
Example for Gmail configuration
Outbound SMTP Port
smtp.gmail.com 587
Inbound IMAP
imap.gmail.com 993
When the two options are correctly configured, the status of this one will be green, on the contrary will be red, indicating that fields must be checked and corrected.
To end the process, the user must click on the "Save" button below.
Apart from that, the campaign can be deleted by selecting it and clicking on the "Delete" button.
Once the campaign is created, this one will appear in the list on the right side of the screen.
If the user selects a campaign from there, all its data will load in the section of the left, so the user can always modify it.
Members
In order to add or delete agents from a campaign, the user must go to Members on the top left corner.
Add Member
In the Campaigns column, select one or more campaigns to which you want to add or remove members.
Select one or more agents from the Agents column and press Add
In the Members column we will see the agents added to the campaign.
To see more about this screen go to Members - Omnichannel
Members added to a campaign must be part of a voice campaign, on the contrary, this agents wont get any interactions from this channel.
Templates
Easily design your own Templates.
Each one of this is assigned to a specific campaign.
To create a new Template, the user must specify its name on the top box and the campaign assigned to this one on the bottom box, which is optional by checking the box next to it.

In case there is no campaign adjudicated to the template, this one will appear for every campaign in the system.
If the user wants to edit an existing Template, first of all select this one from the table below and the template will appear ready to be modified.
Email Dialer Configuration
Configure your Email dialer campaign to send massive volumes of emails.

Campaigns: Every Email campaign in the system will be listed here so it can be associated to the email dialer campaign.
Time between messages: Indicates the time that a new email interaction will enter after closing one.
Schedule: Schedule a date in which it is desired that the dialer works. As an example you can put the dialer to work from Monday to Friday from 13hs to 18hs in which the dialer will start dialing when it is on schedule.
Templates: A template created on the Email campaign section can be adjudicated to the email dialer campaign.
Attach Schedule: The user can attach an event to the email. If the options gets checked, the following will unfold:

Title: Name of the event. The title can have variables as well, this ones must be detailed on the .csv file uploaded to the Dialer. Ex.: ${variableName}
Organizer: Who organized the event. The organizer can have variables as well, this ones must be detailed on the .csv file uploaded to the Dialer. Ex.: ${variableName}
Parametrizable Start Date: The initial date can be added as a varibale. Ex.: ${variableName}
Parametrizable End Date: The end date can be added as a varibale. Ex.: ${variableName}
Start Date: The user can pick an initial date using the calendar.
End Date: The user can pick an end date using the calendar.
Email Agent
This is how the agent uses Email in the portal.
Next to this searching box, there is an icon where the user can easily start interactions.
The following box will unfold:

And inside the Email option:

The agent will have on his Inbox the Email with which she/he started an interaction.

This Email will unfold on the right side of this section, showing its history of conversation and the client's information:
Email Campaign's name
Client's Email
Client's name

When the user opens up the email, this one can be answered to the same user that sent it, or Forward it to as many other users as the person wants.
In section on the left, the user has an interaction searching box.
Can search by campaigns name, client's email, subject and client's name.

An email can be forward, by clicking on the arrow icon next to the answering box.
If the main mail has files attached to it, the forward email is going to have them automatically.
Supervisor
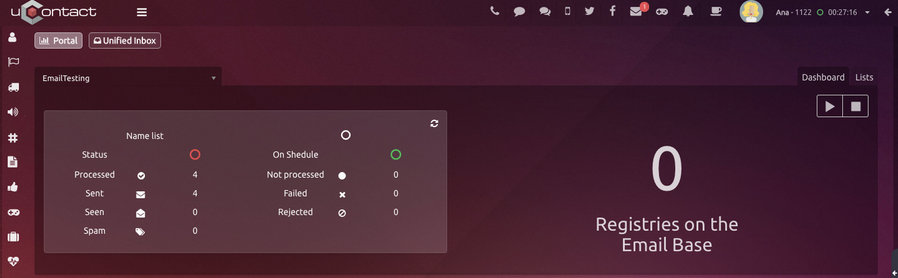
Campaign Monitoring
Here the statistics in real time are shown.

Left down table
Icon
Icon Agent Status. Along with the status icon you may appear: if the agent is in a phone call appears ; and if the agent is to break the break for that picture will appear.Channel Status
If the agent has an interaction opened, the logo of this one will appear in this column for SMS, Webchat, Email and Twitter.
If the agent is attending more than one type of interaction, this one's will appear next to each otherStatus
Agent Status in real time. States can be Offline , Busy, Free, Free Busy in break and break (still break any available).Agent
Name agents members of the campaign.Completed
Number of Emails completed by agent incoming/outgoing.Time
Time of the last change agent statusActive
Represents the interactions that the agent has active.
Right down table
Email: Client's email address
On Hold: Client's waiting time.
When an agent has an active interaction, the supervisor can click on it an the following options will appear:

Spy
Supervisor can view in real time the messages exchanged between agent-client.Screen monitoring
Supervisor can view in real time the agent's screen.Info
Shows the agent information.Pause
Supervisor can pause the agent status.Chat
Supervisor can chat with the agent.Log out agent
Supervisor can log out the agent's account.
Recording
In this section, the supervisor will see every Email chat interaction.

Parameters for filtering
Start date
Start Date Search Email recordings .Final date
End of recordings that we get from the search.Email
E-mail client we want to find . In this field you can put a part of the mail and the search will be the same.Subject
Inbound mail subject.Campaign
Select the campaigns Email available on the list.Agent
Select the agents who attended the Email.
Email Viewer
When the user clicks on one of the mails, the following opens up:

Dialers Monitoring
Menu to supervise the state of the Email campaign services.
Dashboard
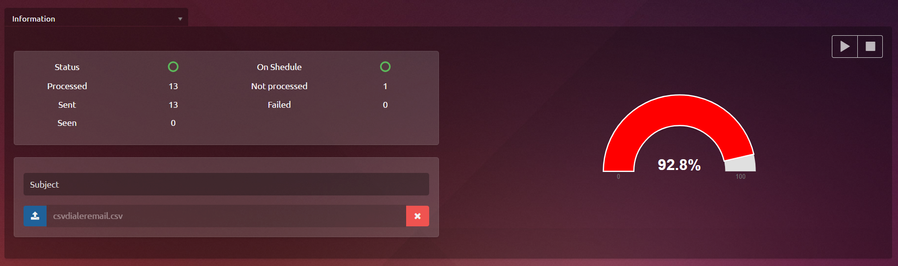
Show all the active emails services, allowing supervise its activity and upload information.
Lists
Section where the email dialer lists are administrated.

Subject: Subject that the mails will have.
Upload List: A csv file can be uploaded as massive registry of contacts to sent the mails to.
The csv file must have the following format:
campaign;destination;message;attachments;variables;priority
The parameter campaign must be the same as the email campaign's name associated to the dialer from where the emails are going to be sent. (Obligatory)
The destination email must be a valid one, if not when the dialer try to send it to this address the action will fail. (Obligatory)
A message to send can be specified. If it is not specified in the list, then the template associated with the dialer will be sent, if there is one, otherwise it will be an empty message.
On the attachments csv division, if the user want to add one, first of all the wanted file must be uploaded on the Attachments section. A text will appear and this one must be copied and pasted on the attachment csv division.
The variables represent the generic fields in the associated template, when the mail is sent these variables will be those that are replaced by the values indicated in this parameter. The generic fields in the template should be indicated as follows ${name}, where name will be the name of the variable. The values of the variables must be separated with two points and must be written as follows: nameVariable1 = value: variableName2 = value.
If the priority is not specified, this one by defect will be 9999.
Attach File: The user must upload a file to attach, then a text will appear. This one must be copied and pasted on the .csv file uploaded as a list, parameter Attachments, as explained before.
An example of the structure that the .csv file list must have, can be downloaded.
Play button to initiate the dialer
Stop button to stop it.
When the dialer is initiated, a graphic will appear indicating the percentage of processed emails. When this one gets to 100%, all the emails on the registry were sent.