| Rw ui textbox macro | ||||
|---|---|---|---|---|
| ||||
|
| Table of Content Zone | ||||||
|---|---|---|---|---|---|---|
| ||||||
|
Voice Campaigns
| Info | ||
|---|---|---|
| ||
Definition of the direction for the campaign: Must specify the type of the campaign. there have two possibilities:
|
Inbound Campaign
| Info | ||
|---|---|---|
| ||
To create our inbound campaign we must specify:
|
| Expand | ||
|---|---|---|
| ||
Email: Campaigns email. Music on Hold: Name of the type of music on hold (default: default) Timeout: How much time the agent's phone rings. Retry: How long to wait before trying again to all members. Wrapup: Time not to send another call after hanging up, allows the agent to finish what he is doing (ex. data entry). Max : Maximum number of people waiting in the campaign line (0 for no limit). Service Level: Threshold to calculate service level. The answered inside the service level in seconds. Weight: Weight of the campaign, priority. Member Delay: Waiting time that the Agent has before being able to speak to the client or listen to an advertisement. Context: Context so that if something is typed while being in the campaign, to go to this last one. Announce Frequency: How often, in seconds, the audio indicated in Periodic Announce is reproduced (0 is off). Time is taken from the beginning of the audio. For ex.: if it indicates 20, then every 20 seconds the audio will be reproduced no matter how long this one is. Take into consideration depending on how long the audio is (it should be shorter than the announce time). Periodic Announce: name of audio to be played from time to time during the wait. It uses the parameter "Announce frequency" to reproduce. Thresholds This section allows you to set thresholds for monitoring the campaign, including:
Record: Whether record or not incoming calls to the inbound campaigns. Auto-Answer: If checked, calls entering through this campaign will be automatically answered, not letting the agent take his/her time to answer. Strategy
Round Seconds: Round seconds in 0, 5, 10, 15, 20 or 30 for report to the caller. Join Empty Comma separated list of:
Leave When empty: leave if the campaign is empty. Out of time: Message reproduced when the campaign is out of time. Quality: Multiple quality models can be adjudicated here. Properties
Breaks Personalized breaks are defined for the campaign, these breaks will be seen by all the agents associated with it.
Voicemail: When this box is checked, the campaign gets a voicemail assigned to it with the 4 digit number the user must write. Voicemail detaills can be found in Voicemail |
Outbound Campaign
| Info | ||
|---|---|---|
| ||
To create our inbound campaign we must specify:
All other fields will be loaded by default with the necessary information for a right operation. |
| Expand | ||
|---|---|---|
| ||
Email: Campaigns email. Wrapup: Time not to send another call after hanging up, allows the agent to finish what he is doing (ex. data entry). Service Level: Threshold to calculate service level. The answered inside the service level in seconds. Quality: Multiple quality models can be adjudicated here. Thresholds This section allows you to set thresholds for monitoring the campaign, including:
Record: Whether record or not incoming calls to the inbound campaigns. |
More Business Configurations
| Rw ui textbox macro | ||
|---|---|---|
| ||
Now our campaign it's ready to take and make calls. It depends of the focus for the campaign if it's necessary to modify the next fields:
|
| Rw ui textbox macro | ||
|---|---|---|
| ||
*DID
|
Members
Adding Agents
Now we have to add agents to answer or make calls through the campaign.
In this screen will see three columns:
- Campaigns
- Members
- Agents
- In the Campaign column select one or multiple campaigns to add or remove members.
- Select one or more agents from Agents column and press Add.
- In Members Column you will see the agents in the campaign.
| Info |
|---|
Functionality when multiple campaigns selection:
|
Members Column
| Info |
|---|
Displays the extensions assigned to the selected campaign, Allows to remove from the campaign one or a group of agents by selecting them and pressing Remove. By clicking the engine icon to the right side of the agent's picture, the Penalty Modal is shown. To less penalty more interactions the agent will take.
|

Agents Column
List of agents that are inside the Administrator's Security Group.
Allows to select one or more agents to be added in the campaign.
Through the Campaign dropbox you will select a group of agents from a specific campaign.
Agents Search
Between Members and Agents columns will see three buttons:
- Add: selected agents from Agents column will be added to selected campaigns
- Search: shows the agent search modal.
- Remove: selected agents from Members column will be removed from selected campaigns.
Search modal
This modal allows to search an agent and shows the campaigns where each one is.
We only write the agent name and make click in search.
In the table we'll see all the results that match with the search.

Let's hands on!
Now we are ready to work!
If you want to test the configuration, just call to the Campaign number (DID) and see uContact works!
As an Administrator you have learned how to creat and set your voice campaign, Congrats!
Now you can see the status of the campaign, for more information see Supervisor Campaigns.
OmniChannel Campaigns
| Info |
|---|
Through the Campaigns Menu you will access to Omnichannel campaigns configuration: |
Administrators are able to create many campaigns for every channel in uContact.
To learn more about configurations, please visit OmniChannel.
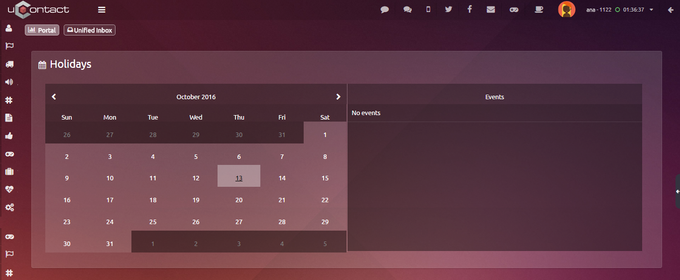
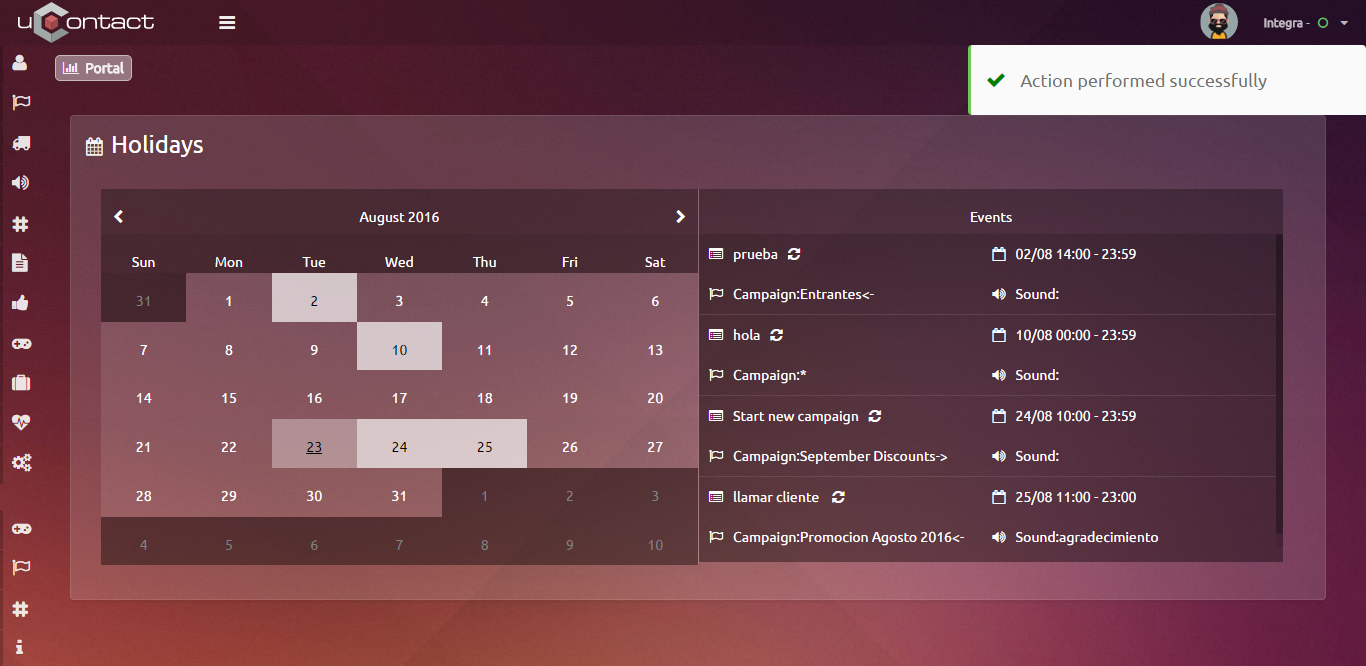
Holidays
Registers holidays for campaigns.

To add a holiday click on a day of the calendar where the next screen will appear.

Description: A description of the holiday..
Start time: Start time of the holiday.
End time: End time of the holiday.
Sound: Sound that the event will have.
Campaign: Select as many campaigns as wanted. To select every campaign in the system, choose the * at the end of the list.
Channels: Select as many channels as wanted. To select every channel in the system, choose the * at the end of the list.
Recurrent: The event will repeat manually.
Non recurrent: The event will not repeat.
When clicking on save, the event will be added to the list that appears at the right of the calendar.

Within the list of events, if the pointer on one of the events is placed , it will be highlighted in the calendar.
The recurrent events are displayed with a loop icon next to the event name.
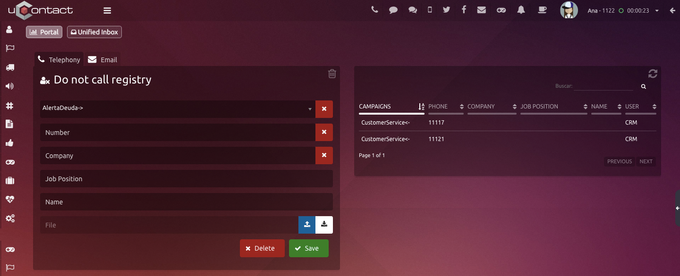
If you want to delete an event , you must point the event that will be deleted and press the cross that appears on the corner.Do not call registry
Telephony
The do not call registry (DNCR) can add numbers to a campaign in which you do not want to make calls.
This feature allows you to manage DNCR of campaigns by adding or removing specific numbers. These features are detailed below .

| title | Parameters Details |
|---|
Campaign: Campaign name to be changed . You can select all campaigns choosing the *.
Number: Number to add or remove from the list.
Company: Company's name.
Job Position: The person job position in the company.
Name: Employee's name.
File: File containing phone numbers to add.
File format .csv
| Info | ||
|---|---|---|
| ||
23578408;campaign 23113758;campaign |
| Expand | ||
|---|---|---|
| ||
To delete contacts that are in a common company or campaign, just select the campaign or company and click on the red button.
This will remove all numbers from the DNCR of the selected campaign or company. |


| title | Remove a number from the list |
|---|
To remove a number from every campaign, the campaign must be selected and the number must be placed. Then press the Delete button.

| Code Block | ||||||||
|---|---|---|---|---|---|---|---|---|
| ||||||||
example1@domain1.com;EmailCampaign
example2@domain1.com;EmailCampaign;;;
example3@domain1.com;EmailCampaign;Company;Joib title;Name |
Company, Job Title and Name are optional fields
An example of how the structure must be, can be downloaded.| Expand | ||
|---|---|---|
| ||
To delete contacts that are in a common company or campaign, just selevct the campaign or company and click on the red button.
This will remove all numbers from the DNCR of the selected campaign or company. |

| Expand | ||
|---|---|---|
| ||
To remove an email from every campaign, the campaign must be selected and the email must be placed. Then press the Delete button.
Another way is by searching the email on the list next to this section, and then press the Delete button. |

To enter this section the user must navigate in the side menu to: Administrator → Campaigns
Once there you will see all the available options according to your security group.
First are the campaign settings, they are:
After them we find other configurations that apply to one or more channels, they will be detailed below.
Holidays
Registers holidays for campaigns.
| Expand | ||
|---|---|---|
| ||
To add a holiday click on a day of the calendar where the next screen will appear. 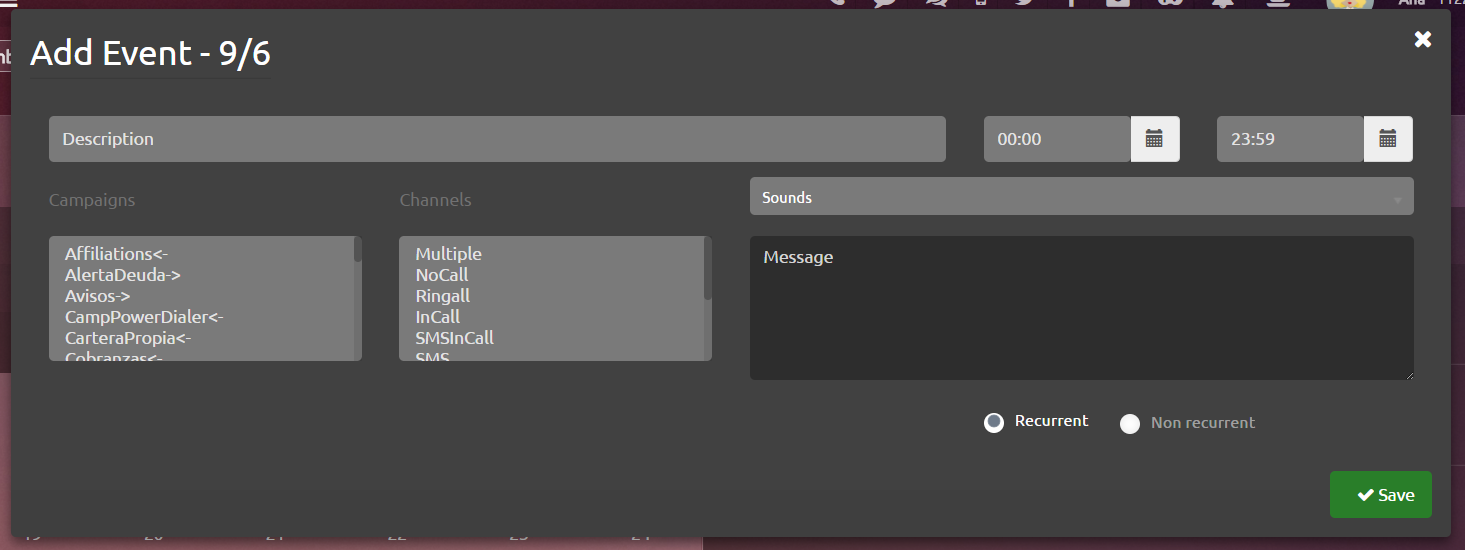 Fields to fill: Description: A description of the holiday.. Start time: Start time of the holiday. End time: End time of the holiday. Sound: Sound that the event will have. Campaign: Select as many campaigns as wanted. To select every campaign in the system, choose the * at the end of the list. Channels: Select as many channels as wanted. To select every channel in the system, choose the * at the end of the list. Recurrent: The event will repeat manually. Non recurrent: The event will not repeat.
 Within the list of events, if the pointer on one of the events is placed , it will be highlighted in the calendar. The recurrent events are displayed with a loop icon next to the event name. If you want to delete an event , you must point the event that will be deleted and press the cross that appears on the corner. |
Do not call registry
This feature allows you to manage DNCR of campaigns by adding or removing specific numbers. These features are detailed below.
Telephony
The do not call registry (DNCR) can add numbers to a campaign in which you do not want to make calls.
| Expand | ||
|---|---|---|
|
To add a number to the list, the campaign must be selected, indicate the number and press the Save button.
If you want to upload multiple phones you can upload a file containing the numbers of the files in the format specified above.
| Rw ui textbox macro | ||
|---|---|---|
| ||
The Email Blacklist allows to manage those emails that get messages as Spam. Every time a client gets an email from an Email Dialer campaign, exclusively, an Unsubscribe button will be on the message as an option to stop receiving emails. From the moment the client clicks on it, the user email will appear on this sections list, indicating its email address and the campaign's name that sent the email. The user won't get more emails from his campaign while being on this list. |

| title | Parameters Details |
|---|
If the Administrator wants to delete a user from the Spam list, just select this one and its details will appear on the left side of this section. Click on the Delete red button.
Campaign: Campaign name to be changed . You can select all campaigns choosing the *.
Email: Email to add or remove from the list.
Company: Company's name.
Job Position: The person job position in the company.
Username: Employee's name.
File: File containing phone numbers to add.
Apart from this, the Administrator can upload a csv file to add email addresses in a massive way.
The csv file must have the following data per line:
Campaign: Campaign name to be changed. You can select all campaigns choosing the *. Number: Number to add or remove from the list. Company: Company's name. Job Position: The person job position in the company. Name: Employee's name. File: File containing phone numbers to add. File format .csv
An example of how the structure must be, can be downloaded. To add a number to the list, the campaign must be selected, indicate the number and press the Save button. If you want to upload multiple phones you can upload a file containing the numbers of the files in the format specified above. |
| Expand | ||
|---|---|---|
| ||
To delete contacts that are in a common company or campaign, just select the campaign or company and click on the red button.   This will remove all numbers from the DNCR of the selected campaign or company. |
| Expand | ||
|---|---|---|
| ||
To remove a number from every campaign, the campaign must be selected and the number must be placed. Then press the Delete button.  Another way is by searching the number on the list next to this section, and then press the Delete button. |
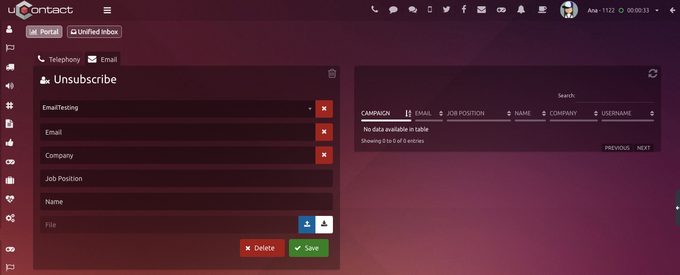
The Email Blacklist allows to manage those emails that get messages as Spam.
Every time a client gets an email from an Email Dialer campaign, exclusively, an Unsubscribe button will be on the message as an option to stop receiving emails.
From the moment the client clicks on it, the user email will appear on this sections list, indicating its email address and the campaign's name that sent the email.
The user won't get more emails from his campaign while being on this list.
| Expand | |||||
|---|---|---|---|---|---|
| |||||
If the Administrator wants to delete a user from the Spam list, just select this one and its details will appear on the left side of this section. Click on the Delete red button. Campaign: Campaign name to be changed . You can select all campaigns choosing the *. Email: Email to add or remove from the list. Company: Company's name. Job Position: The person job position in the company. Username: Employee's name. File: File containing phone numbers to add. Apart from this, the Administrator can upload a csv file to add email addresses in a massive way. The csv file must have the following data per line: EmailBlacklist.csv
Company, Job Title and Name are optional fields An example of how the structure must be, can be downloaded. To add an email to the list, the campaign must be selected, indicate the email and press the Save button. If you want to upload multiple emails you can upload a file containing the emails of the |
files in the format specified above. |
| Expand | ||
|---|---|---|
| ||
In case you want to remove a user from Spam, simply select the email from the list on the right and click on the Delete button. Just like for telephony, you can delete an email for a specific company or campaign or delete an email from all campaigns |
Dispositions
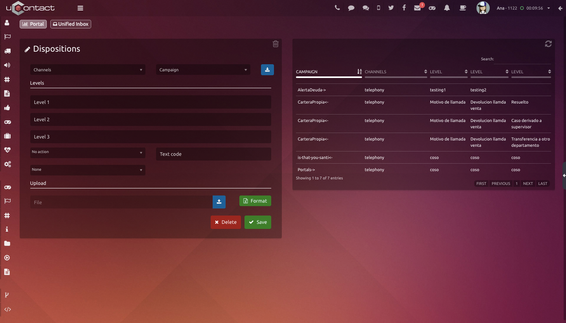
Dispositions are codes or key words working as tags for every call registry, from this, the call center can obtain more efective and quicker results of each management.

| Expand | ||
|---|---|---|
| ||
Channels: Every type of channel in the system, Webchat, Twitter, Redes Sociales, Email y SMS. Campaigns: Depending on the type of channel picked, a campaign from this one must be selected to assign a disposition. |
Download Report: Must specify the channel type and campaign and then click on the button to download the specific report. Levels: These three different levels are the options to specify the disposition. It is obligatory to specify the first level. Action: Specify the type of action this disposition will have. Gamification Measurement: Indicate if this disposition will have an effect on an active Gamification game. Text Code: Optional for those companies that want to integrate this on another system. Upload: Different dispositions can be uploaded massively using a .csv file. Its forma can be seen by downloading it |

here tipificacion.csv
|
In the csv, the channel type section must have one of the followings: email, facebook, webchat, thelephony, twitter, messenger y sms. Level 1 section on the csv, must be specified and he other two ar optional. |
If the campaign does not have a disposition configured, the interactions of the campaign will close normally.
At the same time in the Campaigns creation we will see a checkbox that allows the activation of the disposition modal, both for normal campaigns and dialers (in case the campaign has a Survey type form this option must be deactivated)
| Expand | ||
|---|---|---|
| ||
Once the Disposition section is configured for a particular campaign, when an agent closes an interaction from this last one, the following will unfold: |


When we create dispositions for a campaign or voice dialer that has a Survey type Form we can see that at the end of the call, instead of showing the dispositions modal, they will appear at the bottom of the survey and it cannot be saved until completed the disposition fields.
We will also see a button at the bottom-left corner of the survey that allows you to cancel the survey, and when you click on it we will see a confirmation message as it is an irreversible action.
After confirm the cancellation of the survey, the dispositions will be displayed at the bottom of the survey.
Dispositions Copy
Through this functionality the Administrator will be able to copy the Dispositions from one campaign to another, in this way he will not have to manually type all the Dispositions again.
| Expand | ||
|---|---|---|
| ||
Once we click on the copy button we will open the copy modal. |

 Once here we only have to select the campaign that has the Dispositions to copy and the campaign to which we want them to be copied. Once the campaigns have been selected, we will press the Copy button to make the copy or the Cancel button to not make the copy.  |


| Note |
|---|
|
Blended

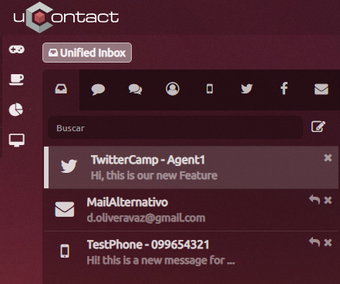
In the following image we can see the Unified Inbox of an Agent that attends different Omnichannel campaigns.
This Feature is not visible on the screen nor is it configurable, it works for the Omnichannel services and allows the Agent to belong to a variety of campaigns of different channels and interact with all of them without any problems.