Amministrazione Email
Configurazione Base Email
Consente all’utente di creare la campagna Email.

Dati Campagna
Nome
Nome della campagna per essere identificata.Livello di Servizio
Percentuale delle chiamate ricevute dall’agente nel tempo stabilito.Strategia
Comportamento della campagna. Per avere ulteriori informazioni, si prego di visitare la pagina StrategiesSchedule
Tempo di disponibilità della campagna, ovvero in cui gli agenti sono disponibili per avere interazioni.
Per aggiungere una configurazione schedule bisogna aggiungerla con il tasto'+' ed una nuova finestra apparirà in modo da poter aggiungere la schedula.
Per eliminare la schedula bisogna selezionarla dalla lista e cliccare sul tasto, '-'.
Dati Email
Account
Account email che ricevera le email.Password
Password dell’account. Se scritto in modo sbagliato, l’utente sarà informato e la campagna non verrà creata finchè la password non risulta corretta.Outbound SMTP
Protocollo per il semplice trasferimento di email.Inbound IMAP
Protocollo per avere accesso ai messaggi.Port
Numero di porta indicato
| Tip |
|---|
Per terminare la creazione l’utente deve cliccare sul tasto “Salva”. |
| Expand | ||
|---|---|---|
| ||
Questi parametri hanno già un valore predefinito per la funzionalità propria della campagna.T Per saperne di più, visitare la pagina Important concepts - Omnichannel Numero massimo di interazioni per Agente Abilita Recevi Emails Firma Qualifica di abilitazione  
Soglie Messaggio di conferma Crittografia/Sicurezza
Quando le due opzioni sono configurate correttamente, lo stato di ognuna diventerà verde, al contrario diventerà rosso, ad indicare che il campo deve essere modificato e corretto |


| Tip |
|---|
Per terminare il processo, l’utente deve cliccare sul tasto “Salva”. Inoltre la campagna può essere eliminata selezionando e cliccando sul tasto “Elimina”. |
Creata la campagna, questa apparirà nell’elenco sulla parte destra dello schermo.
Se l’utente seleziona una campagna da lì, tutti i dati verranno caricati nella sezione a sinistra, in modo che l’utente potrà sempre apportare delle modifiche.
Membri
Per aggiungere o eliminare agenti da una campagna l’utente deve andare su Membri nell’angolo in alto a sinistra
Aggiunta Membri
Nella colonna delle campagne bisogna selezionare una o più campagne a cui aggiungere o da cui eliminare membri.
Selezionare uno o più agenti dalla colonna angenti e cliccare su Aggiungi.
Nella colonna Membri saranno visibili gli agenti aggiunti alla campagna.
| Tip |
|---|
Per saperne di più, visitare la pagina Members - Omnichannel |
| Note |
|---|
I membri aggiunti alla campagna devono far parte di una campagna voce, altrimenti non possono interagire con questo canale. |
Templates
Easily design your own Templates.
Each one of this is assigned to a specific campaignSi può facilmente progettare il proprio template.
Ognuno è associato ad una campagna specifica.
| Expand | ||
|---|---|---|
| ||
To create a new Template, the user must specify its name on the top box and the campaign assigned to this one on the bottom box, which is optional by checking the box next to it.  In case there is no campaign adjudicated to the template, this one will appear for every campaign in the system. If the user wants to edit an existing Template, first of all select this one from the table below and the template will appear ready to be modified. |
Email Dialer Configuration
Configure your Email dialer campaign to send massive volumes of emails
| |
Per creare un nuovo template l’utente dovrà specificare il proprio nome nella casella in alto e la campagna associata a questo nome, il che risulta opzionale andando a modificare la casella accanto.  In caso non sia associata una campagna al template, questo apparirà per ogni campagna nel sistema. Se l’utente vuole modificare un template esistente, dovrà prima selezionarlo dalla tabella sottostante e il template apparirà pronto per la modifica. |
Cinfigurazione del Dialer Email
Permette di configurare il proprio dialer per la campagna email per l’invio di un elevato volume di email.

| Expand | ||
|---|---|---|
| ||
CampaignsCampagne: Every Email campaign in the system will be listed here so it can be associated to the email dialer campaign.Time between Ogni campagna email nel sistema verrà elencata qui così da potervi associare la campagna dialer email.een messages: Indicates the time that a new email interaction will enter after closing one. Schedule: Schedule a date in which it is desired that the dialer works. As an example you can put the dialer to work from Monday to Friday from 13hs to 18hs in which the dialer will start dialing when it is on scheduleProgramma una data in cui si desidera che il dialer lavori. Ad esempio si può impostare che il dialer lavori dal lunedì al venerdi dalle 13:00 alle 18:00 ed esso comincerà a lavorare nell’ora programmata. Templates: A template created on the Email campaign section can be adjudicated to the email dialer campaign. Attach Schedule: The user can attach an event to the email. If the options gets checked, the following will unfold:  Title: Name of the event. The title can have variables as well, this ones must be detailed on the .csv file uploaded to the Dialer. ExSi può associare alla campagna dialer email un template creato appositamente nella sezione campagna Email. Allega Schedula: L’utente può allegare un evento all’email. Se viene effettuato un controllo, verrà compilato il seguente campo: Titolo: Nome dell’evento. Il titolo può avere delle variabili e queste devono essere dettagliate nel file .csv caricato sul dialer. Es.: ${variableName} OrganizerOrganizzatore: Who organized the event. The organizer can have variables as well, this ones must be detailed on the .csv file uploaded to the Dialer. ExChi organizza l’evento. L’organizzatore può avere a disposizione delle variabili e queste devono essere dettagliate sul file .csv caricato sul dialer. Es.: ${variableName} Parametrizable Start Date: The initial date can be added as a varibale. ExLa data iniziale può essere aggiunta come variabile.Es.: ${variableName} Parametrizable End Date: The end date can be added as a varibale. Ex La data finale può essere aggiunta come variabile. Es.: ${variableName} Start Date: The user can pick an initial date using the calendarL’utente può scelgiere una data iniziale utilizzando il calendario. End Date: The user can pick an end date using the calendar. |
Email Agent
This is how the agent uses Email in the portalL’utente può prendere la data finale utilizzando il calendario. |
Agente Email
Questa sezione mostra in che modo l’agente utilizza Email nel portale.
| Expand | ||
|---|---|---|
| ||
Next to this searching box, there is an icon where the user can easily start interactions. The following box will unfold:  And inside the Email option:  The agent will have on his Inbox the Email with which she/he started an interaction.  This Email will unfold on the right side of this section, showing its history of conversation and the client's information:
 When the user opens up the email, this one can be answered to the same user that sent it, or Forward it to as many other users as the person wants. |
| Expand | ||
|---|---|---|
| ||
In section on the left, the user has an interaction searching box.  Can search by campaigns name, client's email, subject and client's name.  |
| Tip |
|---|
An email can be forward, by clicking on the arrow icon next to the answering box.
|
Supervisor
Campaign Monitoring
Here the statistics in real time are shown.
| Expand | ||
|---|---|---|
| ||
 Left down table
Right down table
|
| Expand | ||
|---|---|---|
| ||
When an agent has an active interaction, the supervisor can click on it an the following options will appear: 
|
Recording
In this section, the supervisor will see every Email chat interaction.
| Expand | ||
|---|---|---|
| ||
 Parameters for filtering
Email ViewerWhen the user clicks on one of the mails, the following opens up:  |
Dialers Monitoring
Menu to supervise the state of the Email campaign services.
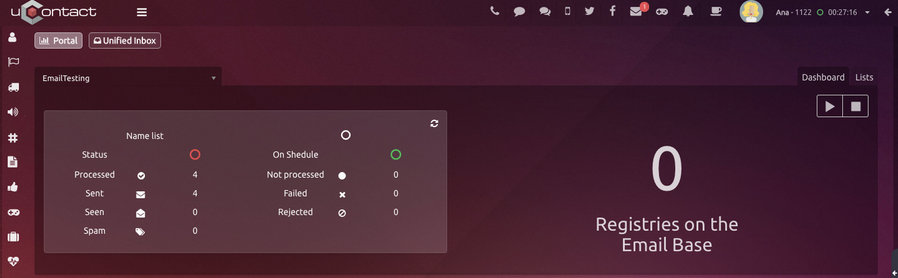
Dashboard
Show all the active emails services, allowing supervise its activity and upload information.
| Expand | ||
|---|---|---|
| ||
Campaign: Allow to select a campaign to supervise. Name List: Name of the active list and its state:
Status: Show the general state of the campaign based on the following states:
In date : Show if the campaign is in date according the definition, with the following status:
Processed: Amount of emails processed for campaigns. Not processed: Number of emails left in the campaign to process. Sent: Number of processed mails that where correctly sent. Failed: Number of processed mails that where not sent correctly. Seen: Number of processed mails that were opened by the recipient. Rejected: Number of rejected emails. Spam: Number of emails that when to spam, this ones are registrated on the Blacklist section. |
Lists
Section where the email dialer lists are administrated.

| Expand | ||
|---|---|---|
| ||
Subject: Subject that the mails will have. Upload List: A csv file can be uploaded as massive registry of contacts to sent the mails to.
The parameter campaign must be the same as the email campaign's name associated to the dialer from where the emails are going to be sent. (Obligatory) The destination email must be a valid one, if not when the dialer try to send it to this address the action will fail. (Obligatory) A message to send can be specified. If it is not specified in the list, then the template associated with the dialer will be sent, if there is one, otherwise it will be an empty message. On the attachments csv division, if the user want to add one, first of all the wanted file must be uploaded on the Attachments section. A text will appear and this one must be copied and pasted on the attachment csv division. The variables represent the generic fields in the associated template, when the mail is sent these variables will be those that are replaced by the values indicated in this parameter. The generic fields in the template should be indicated as follows ${name}, where name will be the name of the variable. The values of the variables must be separated with two points and must be written as follows: nameVariable1 = value: variableName2 = value. If the priority is not specified, this one by defect will be 9999. Attach File: The user must upload a file to attach, then a text will appear. This one must be copied and pasted on the .csv file uploaded as a list, parameter Attachments, as explained before.
When the dialer is initiated, a graphic will appear indicating the percentage of processed emails. When this one gets to 100%, all the emails on the registry were sent. 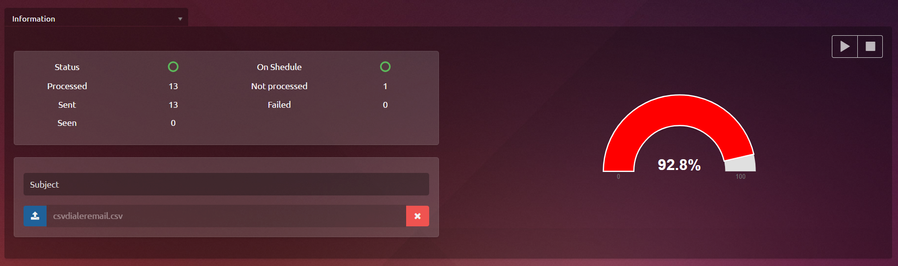 |